Showing posts with label cooking tip. Show all posts

Jan 25, 2018

Is Expensive Chicken Worth It? Comparison of Industrial & Pastured Chicken

In early January, I taught a 5 day high school class for 3 hours a day with my good friend and fellow foodie, Diane Loftness. The course title was "Science and Health of World Cuisines." Our class was based primarily on the findings of dentist Weston A. Price. He traveled the world in the 1930's asking the question, "What does diet and overall health have in common?" As a dentist, he took pictures of people's teeth and facial structures. He found remote peoples in the four corners of the earth with beautiful straight teeth, free from decay. His work is absolutely fascinating. You can find his book, complete with interesting pictures, as a free pdf here. Dr. Price found that as modern foods were introduced to traditional societies, health began to decline. If nothing else, go scroll through some of the pictures.


The class we taught was simultaneously exhilarating and exhausting. Every day Diane and I would empty our kitchens, fill our cars, carry everything to the classroom then teach in a science lab. The kids were eager to learn. We made 4 varieties of sauerkraut, butter, ice cream, whipped cream, smoothies with homemade kefir, ate bone marrow and chia pudding, compared multiple brands of eggs and varieties of yogurt, talked about labels and packaging, and compared nutrient density of organic and conventional produce with a Brix meter.

My favorite activity? Cooking and comparing two whole chickens.

Reason for the Experiment
For at least ten years, I’ve been on an intentional journey to learn more about what goes into my body. It has been eye opening on so many levels.

Early into the journey, I remember cooking two whole chickens simultaneously in separate crock pots. One was for us, the other for a friend. I love sharing good food with others and often take meals to families with a new baby or in distress (or both!) However, because local pastured meat is so much more expensive I decided to save money and buy a grocery store chicken for my friends. It's still a home cooked meal and more nutritious than what they would otherwise eat.

The first chicken to be deboned was the smaller, leaner, pastured chicken from a local farm. BUT then, when taking the meat (and globs of fat!) off the bird from the grocery store... I was totally grossed out.

That day an idea spawned for this experiment. I wondered, “Is it really cheaper to buy the grocery store bird when so much fat is being thrown away?” About the Experiment In class, we compared two chickens: a chicken from Kroger and a local bird. They were cooked separately low and slow, crock pot style for about 10 hours, each in 1500mL of water.

Each bird was weighed in the packaging and again after it was opened and extra liquid drained off. (The Kroger bird lost 8% of its weight before we even started cooking!)

My undergraduate degree is in engineering - I took a fair share of science labs. I’m under no illusion that this experiment is flawless. Rather, please read these results with a grain of salt, knowing more than a few mistakes and discrepancies were made. I have a more extensive spreadsheet if anyone is curious for more details, just contact me.


industrial from Kroger
     pastured, local
cost:
$7.20
$17.24
price per pound
$1.49
$4.34
volume of liquid lost (% purchase weight)
8%
4%
volume of broth (%weight before cooking):
31%
18.3%
% usable meat
43.2%
60.5%

Big Picture Takeaways

Industrial chicken - 8% (or $0.58) was poured down the drain as soon as the package was opened. More broth (which is mostly water) was produced from this chicken than the others. Broth accounted for 31% of its pre-cooked weight - almost double that of the pastured bird. We cut off almost a quarter pound of pure fat before cooking.

Pastured - most expensive and also greatest percentage of usable meat; the bones and fat were separated from meat. The color of the meat was vibrant and the fat was not excessive. This bird was not given antibiotics or fed genetically modified grain (GMOs).

Further Explanation The first chicken we shall discuss in depth is the one industrially raised. Purchased from Kroger under the label of Sanderson Farms, it was $1.49/lb. The package said, “Contains up to 3% retained water.” This bird from Sanderson Farm was decidedly a better option than the cheaper one for $0.99/lb, because that one contained up to 15% chicken broth, carrageenan (which is a name for MSG) and salt. Be sure to read the labels. I was utterly SHOCKED that this bird produced 31% its weight in broth. Some broth is to be expected. But woah Nellie. That’s a lot of water retention.

A local farmer explained to me that industrial chickens are expected to freeze and thaw at least 7 times before they get to your home. As such, the factory packaging process allows the chickens to sit in a “solution” while waiting to be packaged. This marinating time allows absorption of the solution, which helps the texture of meat that has been frozen and thawed multiple times. This also explains the large discrepancy between the volume of broth in the chickens.

Please know that the Kroger bird is still good. I eat chicken from Kroger. It is still food. It is better than fast food. It is better than no food.

The point I’m trying to make is that when you buy an industrial chicken, you are paying for a lot of water...and definitely chemicals.

Did you know that industrially raised animals (beef, pork, chicken) are all given routine antibiotics whether they are needed or not? They are given antibiotics to help them gain weight. (I’m not making this up -- Google and read for yourself.)

Did you know when you eat meat that has been given antibiotics that it not only causes you to more readily gain weight but also you are more resistant to antibiotics when they are needed? Read this interesting article from The Atlantic.

Learning this information about antibiotics is one reason that helped me to rationalize paying more for healthier meat. But I digress...

The second chicken I failed to photograph. Indeed, I failed to take very many pictures during class. I felt like the chicken with its head cut off trying to direct 11 high schoolers in a science lab pretending to be chefs.

The second chicken we cooked in class was purchased locally from GrassRoots Co-op. Pastured chickens are raised outside (fresh air and sunshine) and are moved to new grass (and bugs) twice a day. GrassRoots air-chills their meat -- as compared to a water bath of chemicals where the Kroger bird soaked up so much solution.  GrassRoots freezes their meat immediately after processing, which significantly reduces the risk of food born illness and bacteria.

As for treatment of their animals while alive, GrassRoots has a non-GMO and no antibiotics policy. In fact, they have crazy high standards for their animals. If there’s one thing that is a priority when choosing food for my family, it is avoiding GMOs at all costs (most prevalent GMOs are corn, soy & sugar beets aka white sugar). Here’s a short article on why it is concerning to eat GMOs.

This might sound like a commercial for GrassRoots Farmers’ Coop, who ships directly to your door - to all 48 continental states.  They didn't pay me to write about their meat.  In fact, I paid for the chicken because my usual meat farmer was out of chicken.  If you’re in central Arkansas, Katie of FarmGirl Meats has a delicious meat share program and delivers to Little Rock twice a month. Katie does things right and I whole-heartedly, unashamedly want to promote her too.

Twenty years ago, in college, I worked in an industrial chicken house. The professor I worked with was trying to figure out how to reduce the ammonia in chicken waste by changing the feeding composition and rations.

He also worked with fans in the chicken house, trying to increase fresh air for the birds. When there’s too much ammonia, it causes blindness. Blind birds don’t eat. Dead birds don’t make money.

Here’s a secret: if animals are outside and there’s plenty of grass, giant fans aren’t needed to keep the air clean. When comparing the two chickens before cooking in class, there were obvious visible differences (kicking myself again for not taking pictures).

Imagine this: one bird has a rich reddish brown color and tight skin. The other bird is undeniably white with thick pockets of extra fat, especially near the cavity opening.

The color difference was quite pronounced after cooking, too. The top plate of chicken is the pastured bird, who had variation in its diet. The bottom plate is from a bird that never saw the light of day or even a single bug in its lifetime. Its diet consisted of a lot of government subsidized GMO corn and soy (helping to keep prices low). If color is an indicator of nutrient density (think: white bread vs wheat bread), which plate of chicken do you think is the healthiest?

The price of the pastured chicken was more than twice that of the one from the grocery store.  When I buy a whole chicken, whether it was an expensive one or not, I save the bones to make nourishing broth.  Similar quality broth can be purchased for about $8/quart.  So, if you factor the meat and the broth, the pastured bird isn't that expensive.

Broth can be made from any kind of bones; making broth from an expensive chicken helps justify the cost.

But wait! There’s more! Can you hang with me a bit longer?

I wanted to extend this experiment beyond the classroom. A few weeks after this experiment, I bought a third chicken from Natural Grocers - a natural grocery store near me that prides itself on high quality standards. It is similar to Whole Foods in that the meat sold cannot be given antibiotics.

The third whole chicken I bought was labeled organic (never given antibiotics or genetically modified grains) and air-chilled. It was industrially raised like the one from Kroger (never seeing daylight or having fresh air) also never frozen, thus the label air-chilled. Liquid lost from packaging is the least of the three birds - only 2% or $0.29. It had the lowest volume of broth, probably because it had never been frozen.

You will note in the comparison chart below that the percentage of usable meat is the lowest of the three birds because it was boiled instead of cooking it low and slow like the other two. Removing all the meat from the bones proved difficult. In class we slow cooked two chickens (the good and the best). The third chicken (the better one) was quickly boiled in my kitchen for dinner one night.

Side note: One of the things we talked about in class is the time/money continuum. On the day I boiled the bird for dinner, I didn’t have much time, so I wasted money. There are plenty of ways to save money in the kitchen eating real food if you have the time (like using a whole chicken with bones for $4/lb instead of boneless-skinless at $6-9/lb).

Time was of the essence to get dinner on the table so I boiled the bird in about 30 minutes. The reason this is important to note is because when cooking low and slow, the meat simply falls off the bones. Nothing is wasted. As you can see in the % usable meat, the “better” bird had less usable meat. Much of it clung to the bones because I cooked it too fast.
GOOD
BETTER
BEST
industrial from Kroger
air-chilled Nat. Grocers
pastured, local
cost:
$7.20
$14.70
$17.24
price per pound
$1.49
$3.55
$4.34
volume of liquid lost (% purchase weight)
8%
2%
4%
volume of broth (%weight before cooking):
31%
16.9%
18.3%
% usable meat
43.2%
*38.7%
60.5%
*better chicken was boiled instead of cooked low and slow, like the other two chickens. The quick cook time caused the meat to adhere more to the bones making it more difficult to remove.

So which chicken do I recommend you buy? I can’t answer that for you. You have to wade through your priorities.
  • is nutrient density a priority for your family?
  • are you gaining weight from antibiotics in your meat? concerned about antibiotic resistance?
  • what have you read about the health dangers of GMOs?
  • does it matter to you to know your farmer? source of food?
  • are you concerned about the environment? (Industrial farms are terrible for the environment.)
Many people balk at the idea of paying $17 for a whole chicken. I get it. However, one thing I’ve been convinced of in my 10 year food journey: good food isn’t cheap.

How we spend money speaks to priorities. Some people tell me they “can’t afford to eat healthy/organic/etc.” These same people spend a lot on entertainment: Netflix, cable, cell phones, cinema, concerts. Truth be known, our grandparents spent more of their salary on food than we do.

My husband and I have chosen inexpensive cell phone plans, we don’t have TV/cable, or Netflix, and we don’t spend anything on pharmaceuticals. It is our belief that nourishing our bodies now with clean living, eating healthy, whole foods will result in fewer pharmaceuticals and trip$ to the doctor later. Please don’t hear this as judgement if you choose otherwise. One of the beautiful things about being an American is the freedom to choose how to live. Honestly, I do not think less of a person if they eat junk.  It's your body. (I eat my fair share of junk, too!)

If reading this article is the first you’ve thought about food sourcing, and you like to watch documentaries, may I recommend two?

The first I tell people to watch is called Food, Inc. It exposes many of the problems in our industrial food system. There is a solution to this problem that can be solved by you and me. Food activist Michael Pollan says, “We vote three times a day with our fork.” Fresh the Movie gives practical ideas of how we can change our food system. Both movies were required viewing for the students in the class.

Above all, I hope this chicken experiment has caused you to stop and think about food. Think about where it comes from and what happens to it before it lands on your table. The longer I’m on a food journey, the more I read and learn, the more I am convinced that I am not wasting money on good food. After all, you are what you eat.

Julie
+++++++++
If you're reading this blog post in an email, I probably won't blog here much more.  My husband and I started a blog together.  When I can find the time to write, it will be on that blog. We won't write more than twice a week.  Interested?  Click here, scroll to the bottom and sign up for emails there.

share facebook tweet

Nov 21, 2016

If you're buying sugar, here's a health tip

What's more fitting to follow up the post on nutrient dense breakfast ideas than to give you a tip on sugar? LOL.

It's holiday season and many memories revolve around sugar.  So if you're going to buy sugar here's a tip: look for the words "cane sugar" on the package.

One of my friends who loves baking cakes actually clued me into the fact that not all white sugar is created equal.  If you talk to anyone who is serious about baking, they will probably tell you the same.

What's the difference?
White sugar can be made from sugar cane or sugar beets (not the same as the red beets some people pickle).  Interesting to note, the popularity of sugar beets increased after the civil war because slave labor was used in the production of cane sugar.  Abolitionists helped fund the research to increase the efficiency of sugar beets for white sugar (Wikipedia).

Bakers choose cane sugar because of the chemical properties and its performance.  I choose cane sugar because it is not a genetically modified organism, or GMO.

In 2011, 95% of all beet sugar produced in the US was from GMO sugar beets.  So, if you're buying sugar and you don't see the words cane sugar, you are adding GMOs to your body.

Genetically modified organisms are sprayed with a chemical called glyphosate (or commonly known as Monsanto's Round-up) to control weeds. This glyphosate is toxic and wreaks havoc on the gut and is terrible for your health.

So if you're not in the habit of purchasing organic sugar (which by definition will not be made from GMOs), please look for the words cane sugar.  Your body will thank you.

Cheering you towards baby steps of better health,
Julie

If you're wondering what other GMOs you could be consuming, here's a list of the top 10.

share facebook tweet

May 30, 2015

Tip for Fresh (& Organic!) Veggies

The sight of insects or worms can be unnerving if you aren't used to seeing them in your produce.    Grocery store produce has been washed throughly and is often sterile.  Whereas local produce will have a bit more, shall I say... character

This week in my local veggies, cabbage worms (caterpillars) greeted me.  Upon seeing them, I gave thanks that my farmer wasn't using chemicals to fight the bad guys.  I could fight them in the sink. 

I texted several of my friends, warning them about the crawlies, and encouraged them to eat the broccoli soon. 
One friend texted back with sage wisdom.  In the event you find crawlies in your veggies this summer I'll share her words.  She said, "Mom used to soak veggies in a sink of salt water which would make the worms crawl to the top."

Makes sense to me.  And I tried it - it works.  Once visible, I flicked 'em back in the water where they died.  Soaking in salt water is a bit more laborious than just picking and squishing.  But if squishing gives you the jeebies then try salt water. 
And the next time you see bugs (or bug marks) on your produce from a farmers market, give thanks for chemical-free food!

Julie

share facebook tweet

Mar 9, 2015

Pâté from Butcher and Public

One of the many things I have learned from Dr. Price's work with people untouched by ill-effects of modern food is the importance of eating organ meats.  Organ meats are some of the most nutritionally dense foods on the planet.

Knowing I should eat liver and actually eating liver are two different things.

I've tried to hide liver in enchiladas (my taste buds found it.)  I have a beef tongue in my freezer wanting to try this recipe because I've heard that tongue is quite palatable if you can get over the fact that you're preparing a tongue.  Also in my freezer is a beef heart and too many packages of liver.

Nutrition in my freezer does nothing for my body unless I eat it.

So -- what's a girl to do?

Buy ice cream and pâté.  Seriously.

Ice cream is the reward for eating organ meat.  

What is pâté?  
In simple terms, pâté is cooked ground meat with a high concentration of fat.  Usually it is a combination of meat which includes a portion of liver as well as other organ meats.  Other names it goes by: liverwurst or braunschweiger. 

I decided to leave the preparation to Butcher & Public in Argenta.  [Travis, the butcher, uses locally grown *clean* animals for his meats *awesome*.]  The day I was in the store, they offered two varieties of pâté.  Upon my request, they were eager to offer samples of each type.  In the end I bought some of both.

The variety on the left, above, was composed of liver, kidney and maybe one other organ.  Its texture was similar to bologna; firmer than the pâté on the left.  It was flavorful in a delightful smoked meat kind of way.

The pâté on the right had a higher concentration of liver, which caused it to taste more liver-y.  The texture was creamy, more like a meat mousse, which means it probably also had more fat in it, too.

They both were definitely palatable.  I might go so far to say the one on the left was delicious.
Once home, I toasted slices of a baguette and added honey mustard just as they'd done in the store.  (I make honey mustard with equal parts of ...wait for it...honey and mustard.)

As you may guess, just because I liked the taste of something in the store does not mean it will pass the taste test from the pickiest of my tribe.
 For the gluten-free eaters in my house, I prepared it on slices of cucumber.
What did my family think?

I was shocked.  My most adventurous child couldn't be persuaded to eat more than the thank you portion.  The pickiest eater said, "I could eat this for an after school snack...everyday."  This is saying something.

Here's the kicker: we had pizza for dinner.  The picky child, who always calls me out for even the slightest change in a recipe, had eaten so much pâté that he only ate one piece of pizza -- when he usually eats 3 or 4.  He had eaten more pâté than everyone combined.  This is huge.

The morals from my story:
1.  Buy pâté from Butcher & Public.  Hillcrest Artisan Meats also makes it.  I haven't tried it at HAM but have drooled from their Instagram feed.  
2.  Eat it. (Because it doesn't do the body good just sitting in the fridge.)
3.  Bribe your family with ice cream.  The Clean Plate Club has its rewards.  By the way, when I passed around the initial samples of pâté, I didn't mention ice cream.  I wanted to see what my people would do without a sweet promise.  Ice cream was mentioned after pizza. 

Other articles
How to Eat More Organ Meats by Chris Kessler (great article + recipes)
Health Benefits of Eating Organ Meats by Dr. Mercola
Why Everyone Should Be Eating Organ Meat by The Paleo Mom

Pssst -- Interested in learning about butchering a whole hog?  Travis from Butcher & Public is teaching a class March 21.  Check out the details here.

-Julie

share facebook tweet

Mar 4, 2015

A Salad Dressing for Mexican Night

If you would like a light dressing to compliment a Mexican meal, look no further.  This one is simple yet flavorful.

Often I encourage people, who want to take baby steps towards healthier living, to make their own salad dressing.  Store bought salad dressings are made with unhealthy oils and usually chocked full of corn syrup.  When you make your own salad dressing you know what's in there, the quality is much higher and saves you money.

The 4-Ingredient Salad Dressing

1.  lime juice
2.  honey
3.  olive oil
4.  sea salt

Lime juice = When I made it this week, I juiced 2 limes.  Some limes can be really dry but these gave me about 1/4 cup lime juice.  You could also use bottled lime juice.  I think fresh is more flavorful (when I can remember to grab them while I'm at the store!) but also fresh limes have enzymes that help you digest your food.  The bottled lime juice has been pasteurized for longer shelf life.

honey = I used about 2 tablespoons of honey.  You can add more, or less.  Just don't omit.  Whisk the honey  into the lime juice.

olive oil = about 1/3 cup.  If you can think of the lime juice and honey as one, you want about equal that amount of olive oil.  [I buy a gallon of Chaffin Family Olive Oil once a year.]

sea salt = about 1/2 to 1 teaspoon of sea salt.  Please add the salt.  It's a game changer for this dressing.  Also, making the switch to sea salt is another simple, painless baby step toward healthier living.  The sea provides many trace minerals our modern diets are lacking.

The Salad

Start with green lettuce.  I went to the grocery store specifically to buy jicama but they were out [I've written about jicama here.]  So I decided to add green onions and thin slices of apple, since those are the flavors that jicama imitates.

Easy peasy.  

Hope you try it.
Julie


share facebook tweet

Feb 19, 2015

2 Quick & Easy Veggie Recipes Plus a Kitchen Tip

Remember me raving about Table 28?  I tried to recreate one of our favorite dishes: Brussel sprouts and bacon with pecans.  I started with this recipe but forgot to add the balsamic vinegar.  However, I remembered the pecans and then I added...wait for it...blue cheese.  Heaven, y'all.  Rush to the grocery store now and buy some sprouts and swine.  If you're not a fan of the blue cheese, don't use it but make this recipe.  If you're out of pecans, no worries, make this recipe.  Bacon and Sprouts will do you right.  Pinky swear.  EDIT: Add blue cheese and toasted pecans after roasting Brussel sprouts, just before serving.
Secondly, also the in cruciferous family, is roasted cabbage.  It is only recently that I have become a lover of roasted cabbage.  HB and I took a cooking class at 42 (restaurant at Clinton Library) and the chef quartered heads of cabbage, slathered them in pats of butter, wrapped it in foil then put it on the grill. Wow.  Delish and super easy.

In case you haven't been outside in a while, baby it's cold outside.  And I don't want to grill.

So I bring to you: Roasted Cabbage in a cast iron skillet.
Super easy and fast.

1.  Heat your skillet.  Get it HOT.  (medium high or high setting)
2. Quick chop your cabbage. (or do this ahead)
3. Plop some fat into the skillet, something that can withstand the heat.  Bacon grease is my preference for this dish.  Lard is good.  Ghee.  Coconut oil works too but it will taste coconutty if using unrefined coconut oil.
4.  Drop the cabbage in.
5.  Don't push it around.  Be patient.  Let it sear and get bits of brown crusties.  Use tongs to grab and flip.
6.  Season with sea salt.

I used about 3/4 a head of medium cabbage in this 12" square skillet.  It was probably too much cabbage and crowded the pan but I wanted to clean out the fridge (can I hear an amen from the mommas?)  Waste not want not.  My 2 year old ate the most and there was enough for Hubby to take for lunch today.

Lastly, my tip.  A 25ft roll of parchment paper is $1 at the Dollar Tree next to Michael's on Markham.  Parchment paper has changed my life.  It makes the difference with cookies, the edges are perfect.  Using parchment when you roast anything drastically reduces clean up time.

-Julie

share facebook tweet

Feb 10, 2015

Book Review: All About Braising

On a very long road trip, I listened to a 6-hour recording of a traditional foods cooking class.  Annie Dru was the teacher (her blog recap here).  It was wildly interesting to me on many levels.  One of my take-aways from listening to her teach was to get my hands on a cookbook she kept raving about.

All About Braising: The Art of Uncomplicated Cooking helped me understand a few simple steps that kicked up my pot roast a few notches.  Seriously.

This could be one of my new favorite cookbooks.  If you are new to "grass-finished" beef and find it tough, braising is the answer for such culinary woes.

What is braising?

Simply, think of your crock pot: low and slow heat with some moisture.  However, usually when people use a crock pot, they omit a very important step.  Or, at least, I was guilty of this.  I was too lazy to first sear the meat because it was one more pan to wash.

Braising usually begins with searing meat at high temperatures then finishing in a covered pot at lower temperatures.

The first several pages of the cookbook lays the foundation and explains the art of braising.  She gives some simple do's and don'ts.  Then the rest of the cookbook is full of yummy recipes.

I took notes on some steps that I didn't want to forget.  You can grab a copy of this book at the library --or read my cheater's notes below.  But I think you'll want to see the book.  :)

1.  Braising works well with bone-in meat and/or tough cuts.  Because all muscle contains some amount of collagen (this is what binds the muscle together), by slowing cooking the meat the collagen "melts" out of the meat.  Collagen is in highest concentration nearest to the bone and in coarsely grained meats...or the muscles that are used most in the animal.  Think: shoulder, arm, neck, legs.  This collagen is very soothing and healing for the gut.

2.  The size and type of pot is important.  (The cookbook author was almost anti-crockpot ... get a copy of the book to find out why.)  The pot should fit the size of your meat so that it holds the food snugly and the lid fits securely.

The cycle of steam is important with braising.  The smaller the pot, the tighter the cycle of steam, the more concentrated the juice becomes.

If your pot is too large, or too tall, use a piece of parchment paper to "lower the ceiling."  Cut a piece of paper larger than the opening of your pot.  Crumple it into a wad then open it back up.  Fit it concavely (so there's a dip in the center, but not touching the food) and secure the lid on the top of the pot.

3.  Browning or searing at a medium/high heat.  The surface of the meat must be dry, use paper towels to remove excess moisture once meat is out of its package.

Use just enough fat to cover the bottom of the pan.  Too much will make the dish greasy, too much will result in spotty browning.  I like to use lard (find it at the farmer's market) for this.

Give food space - especially veggies.  As they brown they throw off moisture which causes food to steam, not brown.

Be patient with this step.  I am guilty of pushing food around.  I want to get the good, brown bits on the bottom of the pan in this step.  If I am pushing food around it will never sear properly.  Conversely, don't walk away or set the heat too high.

After browning, evaluate drippings.  Pick out any burnt, black specks.

4. Aromatics are the foundation of a braise: onions, carrots, celery, herbs, bacon...some of these you add half way through the cooking time.

5.  The braising liquid: wine or stock.  Use up to 1/3 way up the sides of the main ingredient.

6. Deglazing and reducing are the two keys to maximum flavor.  I like to deglaze with 1/4-1/2 cup wine and get the yummy golden bits off the bottom of the pan.  Then add more broth/stock and reduce them together.

Bon appétit!
Julie

share facebook tweet

Dec 5, 2014

Creative Storage

The lid to the peanut butter that I frequently buy is the same size as a small mouth canning jar.  I store lots of things in jars, including spices in bulk from Azure Standard.  I prefer plastic lids to their metal counter parts because plastic doesn't rust when I send it through my dishwasher.

The ultimate in recycling is actually using something you'd otherwise throw away.

--Julie

share facebook tweet

Oct 15, 2014

Save Time & Energy with This Tip

The day I realized two whole chickens would fit into my slow cooker --it was a glorious day.
If I'm going to spend the time and energy to debone a chicken, it's not that much more work to debone two.  The crock needs to be cleaned no matter what's inside.

The extra meat can be used for fast week-night meals or frozen for later.

And the additional bones makes it worth my time to make broth.  Win-win.

Julie

PS - Scroll through other cooking tips here.

share facebook tweet

Sep 17, 2014

Broth Making:: Reader's Question

I'm answering a reader's question, below.  Also, I'm hosting a vegetable fermenting class on Friday, September 19 at 3pm in my home.  Email me if you are interested. luvmyhub@gmail DOT com

++++++++
Julie, 
Is bone broth supposed to taste good? My first attempt was nasty and didn't gel at all (was using beef bones).  Where do you get bones?  Do you add chicken feet for gelatin or that Great Lakes gelatin everyone is talking about?  Do you just drink mugs of it or use it for soup base? I appreciate any and all advice. 
Thanks, 
Martha

+++++++++


Hi Martha!

First - let me congratulate you for trying something new and healthy!  Very soon you will be a broth-making master, I just know it! 

There are many ways to make bone broth.  As for the taste, it is not my favorite to drink just plain.  However, if you choose to drink it plain, be sure to add plenty of sea salt.  Salt can be a deal breaker when it comes to flavoring broth or any broth based soup.  Seriously.

In my home broth is used mostly for making soups, rice, greens and reheating food on the stovetop.

Here are some questions that could help you trouble shoot.

1. How much water did you add to the bones?  

I try to just cover the bones with water.  Too much water can cause the broth not to gel.  Even if it doesn't become gelatinous, it will still be healthy for you.  Homemade broth, even watery broth, is so much better for you than the canned stuff from the store.

2.  Did you add any or too much vinegar?  

Vinegar helps to pull out the micro-nutrients and minerals in the bones.  I usually make broth in either a 4 quart or 6 quart crock-pot and use about 1-2 tablespoons of raw apple cider vinegar.  Too much vinegar can give an off taste to broth.

3.  What kind of beef bones?

Beef broth is my favorite to drink.  I have read that for best results with beef bones, make sure they have been broken or sawed so that you can get to the marrow.  I have purchased beef bones from Whole Foods freezer section (middle of aisle, near bottom of freezer case.  They look a bit like white donuts.)  I have also used bones from steaks and roasts (I ask the butcher to leave them in).  

4.  Where can I get more bones?

Another option for bones if you need to make copious amounts of broth is to purchase necks/backs/stock parts from local chicken farmers (Falling Sky, Freckle Face, and FarmGirl are farmers I know that do this).  Or buy wings exclusively for broth.  Using bird bones from conventional farms will still make good broth.

Chicken feet will provide more gelatin to broth and I use them occasionally.  Freckle Face gives them with the purchase of a chicken; I think all the chicken farmers will sell the feet in bulk.

5.  How long and what temperature did you cook the bones?  

My preferred method is to put the bones in the crock pot, cover with cold, filtered water (no chlorine), add a splash of vinegar and turn to low.  I will let this simmer for at least 6-8 hours and up to 24.  I have left it for 48 hours before but will cation you to be sure to check on the water level.  Even with a lid on the slow cooker, water evaporates.  I have found dry bones before.  On that day, without thinking I added a cup of cold water and broke my hot crock.  I think I had a small amount of bones to begin with and it was a busy season; I just forgot about the broth.

If you decide to make broth stovetop, bring it to a boil then lower to simmer for at least a few hours.  I prefer the crockpot because I plug mine up outside and forget about it.  Animals won't bother it because it gets too hot.  I don't have to smell it nor does it add more heat to my house in the summer.  And if I'm too tired at night to deal with the broth/bones, I can let it simmer until the morning without care.  The smell is the biggest factor for me.  While I use a ton of broth --especially in winter when making soups, I do not care for the smell of broth.

6.  Did you add anything else to the broth besides bones?

If you use bones exclusively, you should not have any off tastes.  Some people report that veggies, after an extended period of cooking (like 24 hours), can make the broth bitter.  If I know that I am going to be making broth for a while, I usually do not add any veggies.  That said, some people swear that veggies can make the difference.  I figure that I will add veggies whatever I am cooking and that I don't want to spend money on veggies in broth .  Broth to me is a vehicle for trace minerals and gelatin.  It is more flavorful than cooking with water.

Yesterday I cooked two whole chickens simultaneously in my largest crock pot.  At dinner, I deboned the birds and threw the bones back in to the crock.  I had some random bones saved in the freezer and added these too.  Covered them all with water and added a generous splash of vinegar.  About 10pm, I turned the slow cooker to low outside.  This morning around 10am (12 hours later) I removed 8 cups of broth (or half gallon) for making soup.  I added another 8 cups of water to the bones along with the veggie scraps from making soup (ends from onions, carrots, and celery).  Bay leaves are a good addition, too.  Tonight around 10pm I will remove at least 8 cups of broth then test the bones.  If the bones are still hard, I will add more water.

How does one "test" bones?
Take a bone from your pot and try to squish it between your fingers.  If it is brittle and smashes easily, you have extracted all you can from it.  Throw it away.  If the bones are still firm, let them make more broth for you.  The bigger bones can be cooked longer.  Chicken feet almost always crumble after 12 hours.  If I have a mixture of bones, I use my judgment on when I think the most of the bones are used up.  It's not an exact science.

The smooshing of bones is a great hands-on learning experience for children.  Once I gave my 9-year-old son a steak bone after it had been made to broth for about 48 hours.  I asked him to try to smash it with his bare hands.  He did and couldn't believe it. The look on his face was priceless.  I told him that, "We drink broth because it is so good for us.  This animal gave us meat and minerals. Do you want your bones to crumble like that one day? Keep drinking broth (in soup)."  He ran off with other bones to show his friends. 

Do I use Great Lakes gelatin?
I've never purchased it.  I buy gelatin from Kroger when I am making jello, gummies, or add it to yogurt when I make it.  I am not opposed to Great Lakes, it's just that buying quality gelatin is not on my high priority list.  If I were looking to heal my gut, I would probably buy a better quality. 

Hope that helps.  Let me know if you have more questions.  Give it another try!
Julie

share facebook tweet

Jul 14, 2014

Quick Tip for Packing Lunches


Lunch tip - make several individual bags on Sunday night for the rest of the week.

My oldest son and daughter are both in day camps this week.  They I need to pack lunch everyday.

Sunday night, I popped 3 batches of popcorn, stovetop in coconut oil then bagged it.  My neighbor, whose children are also in camps this week, peeled, sliced and bagged carrots.

We swapped portions.

I gave her bags of popcorn and she gave me bags of carrots.  (I added cucumbers from my garden for my veggie-loving daughter.)

Now lunch making is a breeze because two items from their lunches are already bagged and waiting.

-Julie

share facebook tweet

Jul 13, 2014

How to Cut a Watermelon for a Party

A friend showed me how to do this a few years ago.  It's genius.  Everyone gets a slice and you don't spend ten years cutting it up.  It can be done for a watermelon or cantaloupe.


First you buy a melon from your farmers market.  This one came from Laughing Stock Farms.
Then you lop off both ends.  It helps to have a sharp knife.  I love my Global.
Cut it in half and lay one (big side) face down.
Cut a wedge.
Make slices all around, like the spokes of a wheel.
Put a bowl on top of the melon.  If you have a cute or fancy bowl, the melon will taste better.
Now flip.  You could do this with a cutting board or a cookie sheet.

Invite your hungry friends to join you.


Anyone want to guess hold old that picture is?  This post was originally published four years ago.

share facebook tweet

Apr 16, 2014

How To Cut A Mango

I don't remember where I learned this but every time I cut a mango, I think, "The world needs to know about this trick!"  And so, I took pictures as I cut up yesterday's mango.  
First, choose your mango.  They come in two varieties (that I've found in central Arkansas.)  The one on display is yellow.  However, you will also find a red and green fleshed mango, too.  I think they taste similarly sweet if they are ripe.  How does one know if it is ripe?  It needs to be firm with a bit of a give.  If too firm, or rock hard like a baseball, it is not ripe.

Using a paring knife, cut top to bottom, slightly off center.  There is a giant pit, or seed, in the center.  Go slow and feel your way around the pit.  If you feel there is too much resistance going clockwise, then try the counterclockwise.
 I try to cut as close as I can to the pit so as to remove as much flesh as possible.  Below you can see a bit of the white pit on the left.

Now for the cutting.  I usually score it in thirds from top to bottom.  Try to cut to the skin but not through it.
Then score it again perpendicular to your first cuts.
Here's where I wish for a third hand - or at very least a friend to take pictures.  Imagine two hands below with thumbs pushing the bottom of the mango so that the mango is no longer concave but convex.

 Now it is easy to remove the flesh in pretty little cubes.
 Ta-da!
Repeat with the second half.

Because I don't like wasting any food, I scrape the pit as clean as possible.  

Remove the remaining skin - as you would peel an apple or potato.
 Then slice off any remaining flesh.  These pieces will not be as uniform but they are just as tasty.
And this is what's left of the mango.  I had a neighbor who enjoyed gnawing on the pit.  While I agree it is delicious, I hate the feeling of mango bits between my front teeth.
-Julie

share facebook tweet

Mar 24, 2014

The ONE Thing Every Kitchen Needs

A friend of mine recently asked, "What should I ask for my birthday for the kitchen?"  She's relatively new to the real food scene, and has borrowed a few of my appliances.  Her in-laws are coming into town and want to buy a nice gift.

There are many things that you can "make do" with or simply "do without."  Don't have a whisk?  A fork will do.  Can't afford a food processor?  Usually your blender will get the job done in small batches or use a knife until your arm falls off.  Would love a stand mixer?  The hand-held ones work pretty well - and in absence of those, a giant spoon will get 'er done.

Today as I was chopping, on the heels of attending a free knife skills class at Williams-Sonoma, I thought, I need to tell her to get a sharp knife.


A good, sharp knife is irreplaceable.  

I love mine so much I travel with it (I have a plastic cover for it).  The chef's knife on the far right in the above picture is my all-time-fav.  The brand name is Global, and is lightweight.  It won't break your wrist holding it all day.  I've had it about 12 years now.  It was a gift from my in-laws.  

Believe it or not, I remember using "the knife" for the first time.  Taking a carrot from the fridge and the knife I had been using, along with my new one, I sat the carrot on my chopping board.  First I made a cut with my old knife.  Then I cut the same carrot with my new Global.  Woah.  It went through like butter.  Easy peasy.  

Having a super sharp knife made chopping a fridge full of veggies so fun!  The sharp knife actually made it possible to do the "rocking motion" that professional chefs use when chopping a mountain of veggies.  A dull blade makes that skill virtually impossible.

When visiting other homes, most people will have a relatively sharp paring knife.  Trying to chop an onion with a small knife is like trying to unload a truck full of dirt with a spoon.  It works but takes for-ev-ah.  That's why I bring along my knife.  And when people use it they instantly break into knife envy.  I have to keep an eye on it until it's safe in my drawer at home.

The orange handled knife, above, has a ceramic blade and I've been quite impressed with how sharp it was when I bought it and continues to hold the bevel over 15 months later.  I think it was about $15 at Tuesday Morning.

Try Before You Buy
If you find yourself in the market to buy a knife, let me recommend actually holding a few in your hand.  Go to a store that sells sharp knifes, like Williams-Sonoma, and ask to put your dirty grubby little hands on them.  Even better is to ask if you could take it for a test drive.  Williams-Sonoma usually keeps veggies on hand for this purpose.  What feels awesome in my hand may not feel great in yours.  (Although I think most women prefer lighter knives, like Global.)  In addition, the shape of the blade will influence how you do the rocking/chopping motion.  So at the very least, if you are unable to actually chop something in the store, please put the knife on a cutting board and pretend to get a feel for its performance.

Well, that's the ONE thing I think every kitchen needs.  What do you say?

- Julie

share facebook tweet

Mar 11, 2014

6 Tips for Busy People to Make Real Food

Let's face it.  We're all busy.  And we all need to eat.  Here are some tips for getting real food on the table.

1.  Meal Plan
A mentor once said to me, "Fail to plan?  Then plan to fail."  The adage is especially true when it come to getting real food in your belly.  If I spend 10-15 minutes once a week thinking through our meals, the dividends are priceless.  Grocery shopping is easier because I have a list.  There is less stress during the week because I have a plan at dinner time (or the hours before) - a plan that does not include a "quick trip to get that one thing."

2.  Start early in the day.
Usually, if my dinner meal isn't mostly prepared by noon, we aren't having anything to rave about for dinner.  I'm a mom of little children and we are all tired and needy during the dinner hour (as well as the few hours prior).  It has become my habit to begin dinner as I am cleaning up from breakfast.  Depending on the meal, I may chop here and there, wash a few dishes, stir the pot, etc. and eventually dinner lands on the table after several hours.  They aren't continual or stressful hours.

If you aren't a homemaker,  just five minutes of prep (or chopping) before work can help.  Set out bowls or other equipment you will need once home from work.

3.  Use the weekends to get a jump start on the week.
Normally Sunday night is when I meal plan and grocery shop.  Sometimes on Saturdays I will have a marathon cooking day - mostly because Hubby is home to help meet the needs of our little children.  But you don't have to sacrifice your entire weekend for the sake of food.  Doing small chores can reap huge gains.  For example, recently, I peeled and chopped two butternut squash and stuck it all in the fridge for later meals.  I didn't even use the squash that day.  I had a bit of extra time in the kitchen so I took advantage of it.  Other things I might do in advance are:

 - soak and cook several pounds of beans (freeze in smaller portions)
 - roast and debone two whole chickens (freezing some meat in smaller portions)
 - make broth from the above chickens (freeze extra in smaller portions)
 - brown two pounds of ground beef instead of one.
 - chop several onions or other veggies all at once.
 - cook a double portion of rice (depends on your meal plan for the week, I don't freeze rice).
 - wash/chop greens
 - roast several sweet potatoes at once (or more than one dinner's worth of veggies)

You are more likely to eat veggies if they are prepared and waiting to be cooked.

4.  Double a recipe and freeze half.
If you're going through the motions and mess to make a meal, why not double the ingredients and save yourself time in the kitchen?  Some recipes that I have doubled and work well to freeze:

 - beef tips and rice
 - beef or chicken enchiladas
 - chicken pot pie
 - curried chicken
 - red beans and rice
 - soup of all kinds!

5.  Use a crock pot.
Do I need to convince anyone?  Find some recipes you like and put them in your rotation.  This blog is dedicated to slow cooking.

6.  KISS = Keep it Simple, Silly.
I'm preaching to myself here.  If I'm going to regularly put real food on my table, I need to keep it simple.  Save gourmet for special occasions.

Cheering you on towards real food,
Julie

share facebook tweet

Jan 30, 2014

How to Quickly and Easily Peel A LOT of Garlic

Garlic is really good for anything that ails ya plus it adds so much flava to almost any dish.  I try to use it generously.  But peeling those pesky pods can take forever.

Try this.  Break apart a garlic bulb and toss the cloves into a metal bowl.
Put a smaller bowl on top.  Shake like mad for about ten seconds.  Pretend you're playing percussion in a rock band.
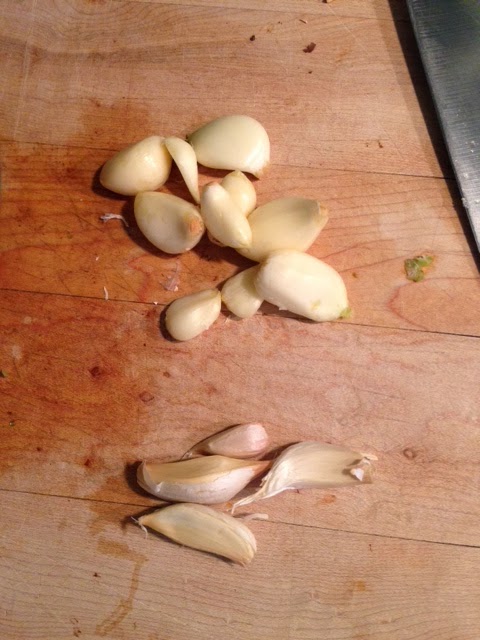
 Voila.  The papery stuff comes off like magic.
Below you can see most of the garlic cloves peeled themselves.  The pile of 4 cloves in the bottom of the picture was easy enough to remove.
Here's to stronger garlic breath,
Julie

share facebook tweet

LinkWithin

Related Posts with Thumbnails